
Serverless Framework with custom authoriser locally (episode 2)
Background
Booyakasha! 🤜
This is the second episode of the AWS Serverless series. In the first episode, we walked through an example of AWS SAM and a custom authorizer.
Today, we are going to explore another approach - Serverless Framework!
Serverless Framework has serverless-offline and serverless-esbuild plugins, which can help you write Lambda in TypeScript and run it with custom authoriser locally.
TL;DR
- Using the Serverless Framework with serverless-offline plugin can simulate the Lambda and API Gateway locally.
- Using Serverless (version 1.72.0 or later), you can write Infrastructure as Code in TypeScript.
- Grab the working example here
https://github.com/Willis0826/serverless-local-authorizer-example (Using TypeScript)
Let's walk through it
We are going to implement a /ping API behind an API Gateway and Custom Authoriser using TypeScript.
The architecture diagram as following:
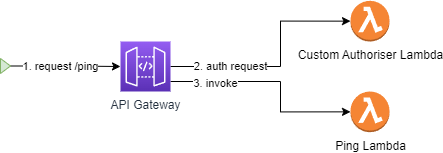
If you have read the first episode, you will notice that we are doing the same thing here, but with the Serverless Framework.
We have five steps to implement for this:
- Setting Up Serverless Plugins
- Creating a Basic API Gateway
- Creating a Ping Lambda
- Creating an Authoriser Lambda
- Verifying the Result
Setting Up Serverless Plugins
We are going to use the following two plugins to create a seamless development experience:
- serverless-offline - Simulate API Gateway and Lambdas locally
- serverless-esbuild - Compile TypeScript to JavaScript
You can use the serverless CLI to generate a new project. However, I recommend cloning the repository serverless-local-authorizer-example to get a workable example.
Once you have a Serverless project, you can install these packages.
$ npm install --save-dev @serverless/typescript
$ npm install --save-dev serverless-esbuild
$ npm install --save-dev serverless-offline
$ npm install --save-dev ts-node tsconfig-paths typescript
All set, you can now create a {project_root_path}/serverless.ts file with the following content.
import type { AWS } from '@serverless/typescript';

const serverlessConfiguration: AWS = {
  service: 'api',
  frameworkVersion: '3',
  plugins: ['serverless-esbuild', 'serverless-offline'],
  provider: {},
  functions: {},
  package: { individually: true },
  custom: {
    esbuild: {
      bundle: true,
      minify: true,
      sourcemap: true,
      exclude: ['aws-sdk'],
      target: 'node20',
      define: { 'require.resolve': undefined },
      platform: 'node',
      concurrency: 10,
    },
  },
};

module.exports = serverlessConfiguration;
Creating a Basic API Gateway
Let's define a very simple API Gateway and some general settings in the provider field of {project_root_path}/serverless.ts.
...

const serverlessConfiguration: AWS = {
  service: 'api',
  frameworkVersion: '3',
  plugins: [ ... ],
  provider: {
    name: 'aws',
    region: "ap-southeast-1",
    runtime: 'nodejs20.x',
    apiGateway: {
      shouldStartNameWithService: true,
    },
    environment: {},
  },
  functions: {},
  package: { ... },
  custom: {
    ...
  },
};

...
Creating a Ping Lambda
Now, we are going to add the first Ping Lambda to this API Gateway.
We need the following three files for the Ping Lambda.
src/functions/ping/handler.tsa handler returns 200 and apongmessage.
import { APIGatewayProxyHandler } from 'aws-lambda';

export const lambdaHandler: APIGatewayProxyHandler = async (_event, _context) => {
  return {
    statusCode: 200,
    body: "pong",
  }
};src/functions/ping/index.tsa serverless definition for the Lambda.
import { handlerPath } from '@libs/handler-resolver';

export default {
  handler: `${handlerPath(__dirname)}/handler.lambdaHandler`,
  events: [
    {
      http: {
        method: 'get',
        path: 'ping',
        authorizer: 'authorizer',
      },
    },
  ],
};src/libs/handler-resolver.tsa helper function to get the current path.
export const handlerPath = (context: string) => {
  return `${context.split(process.cwd())[1].substring(1).replace(/\\/g, '/')}`
};
Now, we've created the Ping Lambda and set the authorizer to a function named authorizer.
Next step, we need to reference this Lambda in the serverless.ts
import type { AWS } from '@serverless/typescript';

import ping from '@functions/ping';

...
const serverlessConfiguration: AWS = {
  ...
  functions: {
    ping,
  },
  ...
}
...
You may have noticed that we use @libs and @serverless while importing stuff. Please follow the tsconfig.json configuration if you fancy this setup.
Creating an Authoriser Lambda
Alright, we are almost there!
We can create an authoriser that does nothing but returning a policy to allow GET/ping request.
src/functions/authorizer/handler.tsa handler acts as a Custom Authoriser.
import { APIGatewayTokenAuthorizerHandler, APIGatewayAuthorizerResult } from 'aws-lambda';

export const lambdaHandler: APIGatewayTokenAuthorizerHandler = async (_event, _context) => {
  return generateAdminPolicy();
};

const generateAdminPolicy = () => {
  const authResponse: APIGatewayAuthorizerResult = {
    principalId: `systemadmin`, // you can assign principalId if you want
    policyDocument: {
      Version: '2012-10-17',
      Statement: [
        {
          Action: 'execute-api:Invoke',
          Effect: 'Allow',
          Resource: 'arn:aws:execute-api:*:*:*/*/GET/ping', // allow access GET/ping
        },
      ],
    },
  };
  return authResponse;
}
src/functions/authorizer/index.tsa serverless definition for the Lambda.
import { handlerPath } from '@libs/handler-resolver';

export default {
  handler: `${handlerPath(__dirname)}/handler.lambdaHandler`,
};
Don't forget to reference this Authorizer Lambda in the serverless.ts.
import type { AWS } from '@serverless/typescript';

import authorizer from '@functions/authorizer';
import ping from '@functions/ping';

...
const serverlessConfiguration: AWS = {
  ...
  functions: {
    authorizer,
    ping,
  },
  ...
}
...
Wicked! You have set up everything. ✌️
Verifying the Result
Let's run the following command to spin up the API Gateway and Lambda locally:
# If you haven't got the Serverless CLI installed
npm install -g serverless

serverless offline start
Your API Gateway is listening on port 3000 with the path prefix /dev. Use the following command to send a request and see it in action.
curl -H "Authorization: abc" http://127.0.0.1:3000/dev/ping
Cheers! 🍺 You can develop AWS Lambda locally now.
Conclusion
We have now covered AWS SAM and Serverless Framework. Both tools support local development and deployment. The remaining question is, how do you choose between these two options?
Personally, I select the options based on these conditions.
🌟 Serverless Framework
- Fast local development experience.
- Ability to write infrastructure as code in TypeScript.
- Support for other cloud providers.
🌟 AWS SAM
- Comfort with CloudFormation.
- Focus on AWS and the ability to configure detailed settings.