
SAM with custom authoriser locally (episode 1)
Background
When you want to develop an AWS Serverless application, you may have heard of this powerful tool - SAM CLI (Serverless Application Model). You can use SAM to create a classic serverless application (including API Gateway and Lambda) on AWS. Also, it can simulate the AWS environment on your local environment.
Recently, SAM CLI added a useful functionality to support simulating API Gateway Custom Authoriser locally. Before this feature was implemented, it can be painful to develop an API Gateway with Custom Authoriser. This post will walk you through an example, and help you use this new feature with ease!
TL;DR
- Grab the working example and play around here https://github.com/Willis0826/sam-local-authorizer-example (Using TypeScript)
Let's walk through it
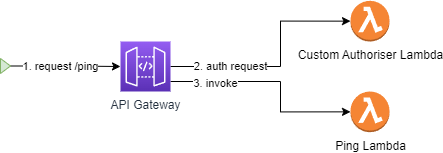
We are going to create an API called Ping with TypeScript. When you invoke this API with path /ping, your request goes through a custom authoriser called Authorizer. If the custom authoriser returns a valid response, your request can reach the Lambda of Ping API.
The architecture diagram as following:
We have four steps to implement this example:
- Creating a Basic API Gateway
- Creating a Ping Lambda
- Creating an Authoriser Lambda
- Verifying the Result
Creating a Basic API Gateway
You can create a brand new project with sam init and remove the stuff you don't need. Or, if you want a minimal working project with TypeScript, you can clone sam-local-authorizer-example.
After you got a SAM project, the first thing you need to do is defining an API Gateway in {project_root_path}/template.yaml.
AWSTemplateFormatVersion: 2010-09-09
Description: >-
  sam-local-authorizer-example
Transform:
- AWS::Serverless-2016-10-31

Resources:
  # API Gateway
  ApiGateway:
    Type: AWS::Serverless::Api
    Properties:
      StageName: dev
      Auth:
        # CORS setting
        AddDefaultAuthorizerToCorsPreflight: false
        ResourcePolicy:
          CustomStatements: [
              {
                "Effect": "Allow",
                "Principal": "*",
                "Action": "execute-api:Invoke",
                "Resource": "execute-api:/*/OPTIONS/*",
              },
            ]
Creating a Ping Lambda
We are going to create a Ping Lambda which response pong when it's invoked. Also, we are going to explore how to develop Lambda with TypeScript.
Let's add the Ping Lambda first!
Create a new file {project_root_path}/src/handlers/ping.ts with the following codes.
import { APIGatewayProxyHandler } from 'aws-lambda';

export const lambdaHandler: APIGatewayProxyHandler = async (event, context) => {
    return {
        statusCode: 200,
        body: "pong",
    }
};
In order to expose the Ping Lambda we created, we need to create another file {project_root_path}/src/app.ts with the following codes.
import { lambdaHandler as PingHandler } from './handlers/ping';


export {
    PingHandler,
}
Now, we got a function ready to handle the Lambda invocation event. But, this is a TypeScript Lambda, we need a file {project_root_path}/package.json as well. The following code is an example of package.json
{
  "name": "sam_local_authorizer_example",
  "version": "1.0.0",
  "description": "lambda",
  "main": "app.js",
  "repository": "",
  "author": "",
  "license": "MIT",
  "dependencies": {},
  "scripts": {
    "build": "sam build",
    "deploy": "sam deploy"
  },
  "devDependencies": {
    "@tsconfig/node18": "^1.0.0",
    "@types/aws-lambda": "^8.10.73",
    "@types/node": "^18.0.0",
    "typescript": "^4.2.3"
  }
}
Finally, let's define this Ping Lambda by adding a new AWS::Serverless::Function resource under Resources section in {project_root_path}/template.yaml.
... Others
Resources:
  ... API Gateway
  # Protected API Lambda
  Ping:
    Type: AWS::Serverless::Function
    Metadata:
      BuildMethod: esbuild
      BuildProperties:
        Minify: true
        Target: es2020
        SourceMap: false
        External:
          - node_modules
        EntryPoints:
          - src/app.ts
    Properties:
      Runtime: nodejs18.x
      CodeUri: ./
      Handler: app.PingHandler
      Events:
        Api:
          Type: Api
          Properties:
            Auth:
              ApiKeyRequired: true
            RestApiId:
              Ref: ApiGateway
            Path: /ping
            Method: get
As you can see, the Ping resource has a section Metadata that tells SAM to use esbuild for your Lambda. Before you run sam build, you may need to make sure you install the esbuild beforehand.
You can use the following command to install esbuild and try to build the Ping Lambda.
npm install -g esbuild
sam build
Now, you should be able to see a new folder {project_root_path}/.aws-sam/build/Ping/app.js contains the transpiled JavaScript.
Creating an Authoriser Lambda
We are going to create a simple Authoriser Lambda in {project_root_path}/src/handlers/authorizer.ts. This Lambda allows all requests to access GET/ping API.
import { APIGatewayTokenAuthorizerHandler, APIGatewayAuthorizerResult } from 'aws-lambda';

export const lambdaHandler: APIGatewayTokenAuthorizerHandler = async (event, context) => {
  return generateAdminPolicy();
};

const generateAdminPolicy = () => {
  const authResponse: APIGatewayAuthorizerResult = {
    principalId: `systemadmin`,
    policyDocument: {
      Version: '2012-10-17',
      Statement: [
        {
          Action: 'execute-api:Invoke',
          Effect: 'Allow',
          Resource: 'arn:aws:execute-api:*:*:*/*/GET/ping',
        },
      ],
    },
  };
  return authResponse;
}
After we created the Authoriser Lambda, we need to expose this Lambda in {project_root_path}/src/app.ts as well.
import { lambdaHandler as AuthorizerHandler } from './handlers/authorizer';
import { lambdaHandler as PingHandler } from './handlers/ping';


export {
    AuthorizerHandler,
    PingHandler,
}
We are almost there! 🚩
Let's define the Authoriser Lambda in {project_root_path}/template.yaml. In order to make the SAM work with Authoriser Lambda locally, the definition of template.yaml is crucial.
We need to add two attributes DefaultAuthorizer and Authorizers to AWS::Serverless::Api resource.
Then, we need to define Authorizer Lambda under Resources section.
... Others
Resources:
  # API Gateway
  ApiGateway:
    Type: AWS::Serverless::Api
    Properties:
      StageName: dev
      Auth:
        ... Others
        DefaultAuthorizer: LambdaTokenAuthorizer
        Authorizers:
          LambdaTokenAuthorizer:
            FunctionPayloadType: TOKEN
            FunctionArn: !GetAtt Authorizer.Arn
            Identity:
              Header: Authorization
              ReauthorizeEvery: 300
  # Auth Lambda
  Authorizer:
    Type: AWS::Serverless::Function
    Metadata:
      BuildMethod: esbuild
      BuildProperties:
        Minify: true
        Target: es2020
        SourceMap: false
        External:
          - node_modules
        EntryPoints:
          - src/app.ts
    Properties:
      Runtime: nodejs18.x
      CodeUri: ./
      Handler: app.AuthorizerHandler
      Timeout: 5
   ... Ping Lambda
Done!🎉 You are all set. Let's jump to the next step to verify the result.
Verifying the Result
Now, you can run the following command to simulate API Gateway and Lambda Authoriser locally.
sam build
sam local start-api

Your API Gateway is listening on port 3000. Using the following command to send a request and see it in action.
curl -H "Authorization: abc" http://127.0.0.1:3000/ping
Cheers! 🍺 That's all. Enjoy the API Gateway and Custom Authoriser locally.
What Is Next?
Check the AWS Serverless - Using Serverless Framework with custom authoriser locally (episode 2) to find out another amazing tool.